The Life of Mud Brick Tiles is Limited

If you’re looking to create an outside living space, you might want to consider the use of Alfresco Concrete Paths and Patio Concrete Driveways. Both products are created with natural stone and are designed to withstand heavy usage. They’re also environmentally friendly, which is great if you’re trying to conserve on construction costs. If you decide to use these exterior concrete creations, you’ll likely wonder how to take care of them so that they remain in peak condition for years to come.

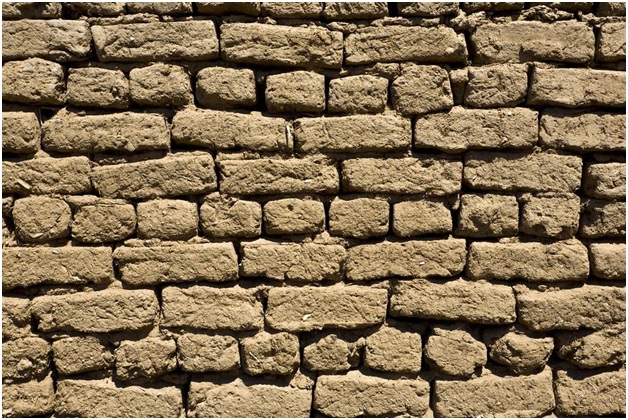
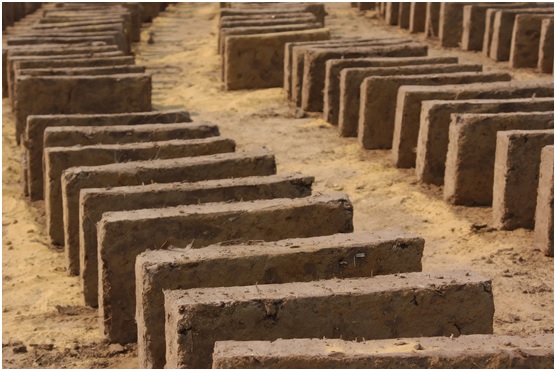
Like most types of natural stones, mud can only be used once and will eventually become stained or damaged. The life of mud bricks is quite limited. Because of their porous structure, mud floors often have low structural integrity compared to other natural stone products. Mud brick’s porosity is also much lower, which means that it takes more frequent maintenance, which is at least twice a week.

With proper care, mud bricks can last up to three decades. To protect your creation from moisture and staining, you should place them in an area that’s free from excessive heat and water. Don’t let them get too cold either, because this could cause cracking. It’s also important that you keep your mud flooring clean so that you don’t have to go through the hassle of cleaning them yourself.

There are many other types of exterior concrete paths, such as Concrete Driveways and Patio Concrete Paths. These creations are quite popular and can be found all over the world. However, there are several factors that you need to take into consideration before deciding on which of these you’d like to use on your property. Most homeowners agree that concrete tiles are definitely the most durable option for outdoor living space.

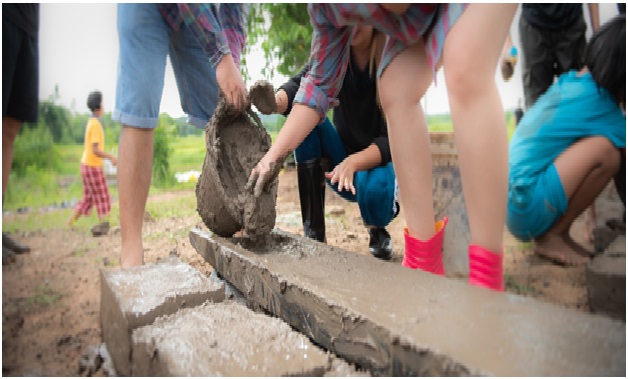
The fact is that mud tiles are quite durable and they will last up to three decades, depending on how you maintain them. If you want to increase the life of your mud tiles, then you’ll have to invest in sealing them. This will increase their durability and help them stay looking new. When sealing your tiles, it’s best to use a silicone-based product so that they can be properly protected. Sealants come in liquid or paste forms and they’re very easy to apply.

Keep in mind that most tiles have a limited lifespan. It’s not uncommon for a mud-brick to last between fifteen and twenty years, while most tiles produced from other materials will be able to last around fifty years. However, if you want to invest in a property that’s going to be useful for generations, then you may want to consider investing in a set of tiles that are a bit more durable. In the end, your investment will be well worth it. As long as you take care of your tiles, there’s no reason why they won’t last for many years.

Muddy Flooring Vs Concrete Floors – Making the Right Choice

Mud flooring vs concrete floors

Mud flooring vs concrete floors – which one is better for your home? This is a very common question among contractors, builders, and homeowners. While most agree that there are advantages to both types of floors, they each have their strong and weak points. Concrete Driveways and Patio Concrete Driveways have their advantages and disadvantages. In this article we will cover both and help you decide which type would be best for you.

Concrete Driveways are the easiest to install and maintain. They are stronger than clay or mud floors because they are composed of thicker and more massive materials. They also hold up better to high temperatures from the sun, snow, etc. Most concrete driveways come in a variety of colors and can be left natural or colored to match your house.

Mud is an excellent choice for concrete driveways and patios. Concrete is easier to clean and stain resistant. However, there are some disadvantages to concrete. Because it is very dense, it takes more energy to move this material and it can break down over time. It is also more susceptible to hydrostatic pressure, which means the liquid it contains can seep into cracks. If you have an underground pool or spa area, concrete might not be the best choice for you.

Mud is relatively easy to maintain. It is stain resistant and has anti-microbial properties which make it resistant to bacteria, mold, and mildew. Some companies that produce and sell concrete flooring do recommend against painting on top of it because it may erode over time. For areas that are constantly wet, concrete floors are ideal.

Concrete is a bit more expensive than mud. If you are planning on installing concrete floors, it would be wise to build your garage or other outbuilding off-site so that you have access to it. That way, you won’t have to pay the additional expense to install an above-ground garage. In addition, it is harder to refinish and resell concrete floors than it is to paint. Because of these factors, it would be a better idea to build a home with concrete rather than painting a garage or other building that requires you to use petroleum-based products to keep it looking good year after year.

There are certainly many reasons why people choose to use mud as a flooring option. If you are looking for a durable, attractive option for your garage or other outbuildings, then mud could be the answer you are looking for. Of course, there are several other options out there as well. Before making your final decision, it is important to take the time to consider all of the pros and cons of each type of material. Once you understand how mud flooring works, you will have a great idea of whether or not it is right for you.

Advantages and Disadvantages of Mud Bricks

Mud bricks also called as adobe bricks are prepared of earth with a high content of straw and clay. If it is produced by manually, the earth mix is poured in open molds and are allowed to dry. These mud bricks are not kiln fired, they are only sun-dried and while used for the construction purpose, these bricks are fixed in the wall by utilizing the mortar of earth and finished walls are softened before they are dried out it. Even the clay render is often applied as a surface coating.

In those countries with a huge demand for mud bricks, they are prepared by adopting a brick making machine or they are made mechanically in commercial brick making yards.


Advantages of Mud bricks

Using these mud bricks or adobe bricks is probably one of the easiest way to build for homes. The mud walls have numerous advantages and relatively less cons.

Because of the clay nature and the production, these mud bricks consists of good water resistance. It is also very vital to give adequate weather protection of the earth walls, mainly in the exposed situations. It is generally done with the provision of adequate eaves.

Other advantages of using these mud bricks include general feeling of security and solidity as well as less sound transmitting through walls.

With the sufficient supervision, this mud bricks technique is highly suitable for building owners because for it no expensive equipment or tools are required. And as it is easy to know-how these bricks can be easily acquired on a training workshop and through hands-on experiences.

One of the main benefits of the mud bricks is that it let the individual units or the bricks to get shrink totally before they are places in the wall. The risk of cracking and shrinkage that can occur in large content in monolithic wall is prevented.

The mud bricks can be cast from a large range of soils that is suitable even with the high content of clay than with the in-situ techniques.

The small mud units offer good flexibility in the construction and design of earth buildings. These mud bricks can be easily cut for fitting and could be provided with holes for services and reinforcing.

Most of the people find these mud walls texture and pattern very attractive.

Disadvantages of mud bricks

  • The life of mud bricks is limited.
  • The mud flooring surface is not smooth as compared to PVC.
  • Mud flooring generally has low resistance to stain as it has high porosity.
  • Mud flooring requires often maintenance that is at least two times a week.
  • These mud bricks flooring is not as durable as flooring of PVC.
  • Mud bricks flooring is non-resistant towards moisture and hence it could cause bacteria go grow which is unhygienic.

Make Mud Bricks in 6 Steps

Mud bricks also called as adobe bricks are one of the older forms of the building materials that are very simple to make and are inexpensive. These mud bricks are environmentally friendly, and are used all over the world for fireproof as well as low-cost buildings. So to prepare such type of bricks, initially make sure that you have a dry area that is cleared well for making the bricks as these bricks can take several days to dry and may need to be safe place that is away from the rain and water. Here are steps to follow to prepare your own mud bricks.


Step 1 –  Take out Enough Soil

As an initially step, collect the enough loamy soil to start preparation of your mud bricks. This soil can be collected from the sides or top of any natural hill as the soil from those places are very good to make the mud bricks that can withstand erosion and rain. You can even mix this soil with some sand to enhance the quality. Filter the collected soil by a mesh screen to take off any stones present in it that could weaken the strength of bricks and can cause cracks in them

Step 2 – Prepare the Mold

By using any 2 five foot length lumbers on the sides, cut down the third into 6 pieces with each piece being 14 inches long and then nail those pieces again to two five foot lengths, ten inches apart. Your final frame would look like a ladder that consists molds for five bricks, each with dimensions 10″ x 14″.

Step 3 – Dig a Pit

If you want to just make few bricks, then by using wheelbarrow blend the total soil. Dig a huge hole that is three feet deep in to the ground and then fill that hole with water and allow it to drain itself. This whole process can take place for at least 24 hours. However, it is very important to do as it would totally prevent the crumbling of walls during the mixing process.

Step 4 – Mix the Soil

Fill half of the hole with soil. Take a bucket full of water and add a soil to it along with hoe or shovel mixing. Adding some manure or straw can be done to prevent the cracking of bricks. Add required water to make thick mix.

Step 5 – Add the Mixture to the Mold

Allow the mold to be flat and make it to get dry. Pour the mole into each section, filling it completely. Pat the top of it strongly with the shovel back to pack it tightly to remove excess water or air bubbles.

Step 6 – Allow it to Dry

Make the mud bricks to settle down for long time before taking the mold off. Move them to another dry spot to prepare another set of five bricks. Continue this process until the required bricks are prepared.

Wait at least for 12 days before using your sun-dried bricks. All the bricks edges have to turn into white colour before you can use them, otherwise the bricks can crumble. These sun dried bricks can last up to nearly 35 years before they start to crack. So it’s best to fire them in a kiln if you want them to last longer.

How to Make Mud Bricks for the Wet Climate

Mud bricks are one of the important building supplies that are prepared of earthen raw materials which are composed with high quantity of skill and water. These mud bricks generally would hold as a set offering the basic building block for the construction purposes. However, if you are the one living in wet climate or damp, it is very vital to ensure that all the mud bricks would hold up during the time of humidity and heavy rains. 

Mud bricks prepared from the soil mainly consisting the clay would generally have a waterproof quality naturally that could also controls and can even combat the humidity condition. Though it can take some error and trial methods for the getting the right mixture, there is also way to prepare your own mud bricks for the wet climate. All chores that had been successful done through several trial and error method just like the Tree Removal Brisbane North service they are specialist today due to those mistakes they’d in the past which taught them to become a pro in the field of tree service. Meanwhile, here suggestions on to prepare your durable mud bricks. 

Preparation of Moisture-Resistant Mud Bricks

From any of your local soil store, buy the soil that consists of little amount of clay as clay could add more strength and can enhance the mudbrick properties of resistance towards moisture. But keep in mind that using excess of clay can lead to cracking of your bricks. So the soil amount you would need probably depends on the number of mud bricks you are planning to prepare. As a starting step, pour all the soil in to five-gallon bucket and then blend it with a little amount of cement as cement would enhance your mud bricks strength. On the other hand, also add the water in to it, till you get pasty and thick consistency. Later, pour this thick and pasty mixture of mud in to wooden frame sections. After filling each section, use a 2×4 piece of wood to level off the top of each brick. Finally, allow the mud bricks to set and then dry it for at least three to four hours. After drying them, take off the frame from the bricks and by using the putty knife, scrape the frame cleanly to reuse it for next time. 

After the completion of whole process, let the bricks to dry for three to four days and then turn every brick on its side. Let the bricks dry further for three to four more days, sitting on their sides. Once all the sides of bricks are dry, then again use a putty knife to shave and scrape all the uneven surfaces and to remove excess mud layers from the sides of the bricks.

Warning : At starting, just prepare one test brick before you commit to make a more number of bricks. If you observe any cracking of the bricks, while they dry, it means your soil contains too much of clay. At that time, blend the mixture of mud brick with some sand to overcome cracking in the subsequent batches.